My love for all things navy

Friday, January 22, 2021

 I don’t know if it was the darkness of 2020 or what happened but I starting doing accent walls in navy. Which I’ve never been a fan of accent walls. Have your done weird things durning covid in your home? 


I’m going to keep them for now. Definitely seems to be a color I’m feeling for 2020, let’s see what 2021 brings in the new house.


Read More

Painted tile floor laundry room

Sunday, January 10, 2021

I had done the floor pops over my tiles in our old house and really loved the pattern, you can view them Here 


Rust-oleum s always one of my favorite paints, they have so many awesome products. I love their chalk paint and use it on all my furniture, so thought I’d give their floor coating a try. I’ve seen posts were people use the chalk paint as well. This is our laundry/mud room walk thru to garage. So I wanted to make sure it’s durable. You can order the cans separately here from amazon pre mixed. I think white and navy would look soo good.

For a complete tutorial on how we did this project you can find it here 

Before...I will have to see if I can find a before I started painting.
But as you can see it’s just the boring tiles there was nothing wrong with them, just outdated and my floor ALWAYS looked dirty!
I first cleaned the entire floor. 


Then used a sponge roller like this.
We first painted with the lighter color and let that dry about 6 hours...then we went back with the darker color and laid the stencil on each square, did not tape, just rolled it over. Try to not get too much paint on your roller so it doesn’t seep or get too dark.
You can get the stencil Here

Make sure you get a stencil the same size as your tile. I had 12x12 standard tiles. 
I just laid it down and rolled over it with a sponge roller. It moves pretty quick.


Rust-oleum has a new product called floor coating. We were doing a few different places, so we got one kit in silver, and another kit in charcoal. The kit comes with a cleaner and a glaze. I believe you can buy them separately. The glaze goes along way😊.

You can order the can separately here from amazon pre mixed. I think white and navy would look soo good.


We did this over two days, we painted behind the washer and  dryer first, which was a great place to practice with your stencil! My first one I added too much paint to the roller, so when I pulled it up it was blotchy. Make sure you don't add too much paint. 

Then we were painted the entire floor silver grey. I used the stencils in the front of the laundry room first, let it dry then moved onto the other side working back. 

The lighter ones show they aren’t quite dry, but I’m loving the results. It’s so Bright. Which is crazy I had changed my cabinets from white to black right before we did the floor.  (Note the front off the cabinet...I also painted my utility tub in the floor paint, more on that later.)


We did decide to add a coat of polycrylic in satin. It does give it a bit more shine, and a little more slippery. We did this in a satin finish. I didn’t want high gloss. So all the paints I used were matte or satin.
Ignore the bench, it’s on its way to the garage, next adding bead board and hooks!!!


Before photo


Read More

Christmas

Sunday, December 13, 2020


Read More

Target mantle $1 section

There little trees and houses I found at Target in their dollar section! They were the perfect simple addition to our new house.


Read More

Drainboard Farmhouse sink redo

Monday, October 26, 2020

This sink is so large and gives my half bath so much character. When I bought my farmhouse, it had nothing original. I scored this sink outside in an alley waiting for the trash!! The crazy thing is I had been looking for a sink just like this for this bath. My half bath is off my kitchen which can be quite strange, So I just embraced the fact that I have this half bath off my kitchen. Adding this sink has just made this half bath such a show stopper..  My home is from 1901 so it's pretty cool to have a true farmhouse sink for our guest bathroom. 
To find out how I cleaned it here

Love old things 


The sink had the original cabinet as well, I didn’t ever plan to put them together. I knew I was wanting to find the perfect cabinet or dresser for the sink. 
The sink had no cracks or chips. I just had to bring it in and shine it up. I soaked it with CLR first trying to loosen up any deposits and residue or rust on the tub, I left that in the tub soaking for hours.
Once I finished that, I went back and scrubbed it with bleach, just to get anything that was left. 
Completely dry it out and give it a good scrub with a soft cloth and comet powder.
That should get all of all the old yuck off the porcelain sink.
Then go over it with a Magic eraser. They work great for any left over scuffs. I do need to redo from time to time give it a good scrub with the Comet powder.


I was able to find an antique dresser on craigslist  that was wide  and deep enough to hold the frame of the farmhouse sink. I removed the top of the dresser and braced the back with 2x4s. I had to cut the back off of the drawers and shorten them to allow for plumbing. These sinks have a big cast iron lip that held on great to the edge of the dresser.

The top two drawers are just the fronts, I had to completely take out the inside and just attach the front of the drawers.  
The bottom drawers are about 8 inches deep. I  used my circular saw to shorten them, and nailed the original back on to the shortened drawer. They aren't very deep but perfect for storing toilet paper rolls and extra hand towels.


They still make this faucet for these sinks, it wasn't easy to get the old off, I found the new one at my local Menards! I can not find the exact one anymore. This one here is similar from Amazon.
They have them in oil bronze finish as well, here and here they just don't have the little soap dish. Just make sure you measure the space between each mount for hot and cold to get the right size.

The mess before it gets pretty. Every project has to be ugly first...

The sink I had before just standard  boring. I had decided to go dark with the walls in Graphite Charcoal from Behr since the new sink was so white and such a show stopper for the room.


before......


Here it is waiting for the trash


I even loved this old cabinet but it had a lot of rust and I wasn't up for that kind of redo.


The flooring in this bathroom was done with peel and stick from floor pops. I purchased them on amazon. Here

Read More

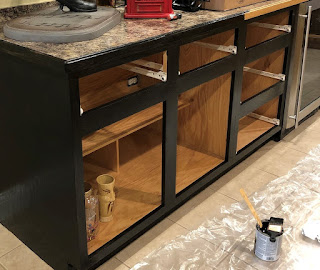
From honey oak to Black cabinets

Saturday, October 24, 2020


Stained black cabinets

Supplies 

  • Black stain in poly+stain here or mini wax brand here
  • plastic tarp
  • mini foam roller
  • brush
  • tape
  • tray 
  • all purpose cleaner
  • light sanding pad 
Take off all your doors and lay out on a flat surface on a tarp. Make sure to wipe down all the fronts of your cabinets and doors.

I always start rolling the inside of the doors first, while they are laid out. That way you can get your technique down before you are working on the fronts of your doors.


Once you have one coat on the inside of your doors, you can move to the base of your cabinet fronts. making sure to cover all areas with your roller, and brushing along the trim and inside corners of your cabinets. .

It goes on pretty evenly but make sure to go back and check for any drips and even them out.


The stain does take a little longer to dry than if you were to paint them. But the finish is worth the wait time. After a couple of hours you can go back and add your second coat to the back of your doors and the cabinet front.

Let the doors dry overnight before flipping them over to work on your fronts.
Making sure to brush into any creases. Roll the stain over the front of the doors. 
Once you have added your second coat on your doors, you can let that set for a good 6 hours, until they are no longer tacky to install the doors. you want to make sure to give them a good 24 hours to cure before using them.


Our basement bar had all honey oak cabinets. I wanted to update them without having to completely replace. 
The Polyshades is great for applications like black or any dark colors, you don't wipe off the stain like you would with just regular stains. It really makes a nice finish for wood cabinets. The best part is that is requires little or no sanding. Depending on how much sheen you have on your wood cabinets.


I love this stain. It took so well to the wood cabinets. I absolutely love the finish!!! It can be bought here 
I just wiped the cabinets down and brushed and rolled on this black stain. I didn't sand mine at all.
This is not your traditional stain that you wipe off. SO do not wipe the stain off. 
You will be able to scratch them until they are cured so give a couple of days to completely cure


Please excuse the mess, we have been in the new house just over a month. It feels like every time I get thru all the boxes We  have a fresh pile coming thru the door.

I will leave the insides the oak color, all you need to do is the fronts and backs, then the fronts of the cabinets. I have found some cool peel and stick paper for the inside of the shelves and drawers. pics to come....


The stain was in black satin. It has the poly mixed with the stain so it works great for these cabinets instead of painting them. You can still see the wood grain even thru the black, and I prefer water based over oil based
Make sure you pay close attention to the finish you are getting when you pick your stain. I choose satin because I did not want super shinny finish. They come in gloss, satin, high gloss. So pay attention to the sheen you want to achieve on your finished project.


Here is another honey oak project I used the same stain in but in a dark brown, called mission oak.
Same great finish, just a little longer drying time than paint.
Again the original railing was the honey oak, which you can see the trim around the door in the background.


The finish is so smooth when it is finished. I love how it turned out. I hope this inspires you to do something fun in your home and give you a fresh look.


 I hope this helps you make your home more personal and gives you the confidence to try something new.

Don't let fear of trying something hold you back. It's okay to make mistakes along the way, that's how we learn what we don't like.


When I use a product I do try to link it for you and if you decide to purchase the product I am affiliated with some of those companies. Its the only way to offset the time it takes building my how tos for decorating and DIY.

I am in no way asking you to click and purchase any items but it makes it easier for all the info to be on one site. Many different stores carry the products I use. But the links I provide is where I had purchased.


I hope that helps you make your home more personal and gives you the confidence to try something new.


Read More