Showing posts with label farmhouse kitchen. Show all posts

Modern Farmhouse kitchenette Black kitchen cabinets

Wednesday, February 17, 2021

Honey Oak to Black French Farmhouse-

The challenge here was to design an existing kitchen to blend with our massive bar/pub and game room. Our basement was very country looking, with a lot of orange tones. It has a lot of natural lighting and is a walk out. So we really went with a dark tone in the walls, cabinets, and ceiling.


We didn't want to replace any of the appliances or countertops, but I couldn't live with the honey oak cabinets. We don't cook a lot to justify spending the money to redo the entire kitchenette, so we went with a color palette to incorporate the space we currently have with our pub themed basement.


Added a veneer backsplash to give the room some texture. Wayfair sells this in peel and stick. Super easy to apply.
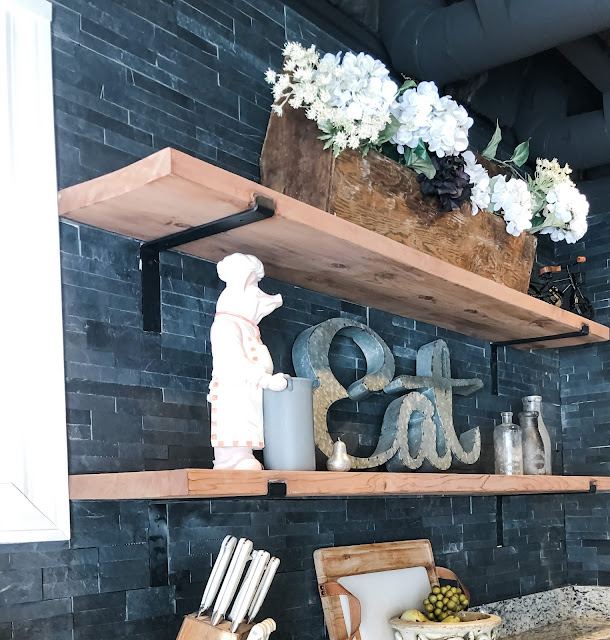

Our new kitchenette has tons of texture. I wanted to blend with our existing countertops and not replace the granite that was there. The backdrop of warm tones is a great base for decor and it will be a fun space to easily change up with the seasons.

The stain on the shelves is vinegar stain, which brings out the natural grain in your woods, while aging it. For the details on How to achieve that look  here


We added farmhouse brackets and chunky shelves to give the kitchenette and updated look with more storage.


The shelf brackets came from amazon here


I used peel and stick wallpaper for my drawers and drawers. It’s so much thicker and luxurious then using contact paper. They have a much larger selection of colors and patterns too, then what you’ll find in contact paper. Here is the one I choose.


White was my first choice for the honey cabinets, but half way thru the painting I derailed and re-painted the cabinets in black. We have a lot of natural lighting so the area isn't dark it all. The transformation has actually helped the space feel more homey and welcoming.
We added the same veneer to the back of the island.


Here is the other side of the basement. Our pub style bar in progress. We opened up the basement by having  the drop ceilings removed and sprayed flat black.


Before it was just okay. I am not a fan of anything honey oak. The cabinets were in great shape we just needed to add some color.
want to know where to get the backsplash?  I linked the one we purchased here

The shelf brackets came from amazon here

The stain on the shelves is vinegar stain here
 
The paint color for cabinets is Dark secret Behr 

 I hope this helps you make your home more personal and gives you the confidence to try something new.

Don't let fear of trying something hold you back. It's okay to make mistakes along the way, that's how we learn what we don't like.


When I use a product I do try to link it for you and if you decide to purchase the product I am affiliated with some of those companies. Its the only way to offset the time it takes building my how tos for decorating and DIY.

I am in no way asking you to click and purchase any items but it makes it easier for all the info to be on one site. Many different stores carry the products I use. But the links I provide is where I had purchased.


I hope that helps you make your home more personal and gives you the confidence to try something new.

Read More

Vinegar stain. Best aged wood look ever.

Monday, January 25, 2021

Supplies

  • 1-quart Mason jar and lid 
  • Extra-fine steel wool 
  • Distilled white vinegar 
  • Fine strainer 
  • Paintbrush 


Making your vinegar stain

  • Put the steel wool pad into a Mason jar then add vinegar, fill about 3/4 full.  I prefer to not cover the mixture (the mixture will give off gases), set aside for at least 3 days. The longer it sits, the darker the stain will become.
  • Stir and then strain the mixture  through a fine-meshed strainer, some people also use a coffee filter to get any left over particles. I have not. 
  • Now stain your pieces as you normally would. You can sand the wood first to get a stronger grained effect. (Always do a test piece first before staining)  
  • As the stain dries it will darken. Once the stain has fully dried, seal with a wax or polyurethane finish. They say you can keep the stain for a few months, but I always dispose of any leftover, because I am not sure of the reaction of its shelf life, 


Here is a before and after of vinegar stain on new common wood.


You brush on the vinegar stain and watch it change colors and bring out all the grain and detail as it dries.


I am a big fan of aged wood and this is the best finish I have found for turning new wood into reclaimed looking wood. 
One you brush the wood And cover the entire section you will see it starts changing colors, keep moving with the stain to make sure it blends evenly.  Once you have brushed the entire piece with the stain. give it a good wipe down with a cotton cloth to remove any excess stain. Let completely dry before you wax or polyurethane.


If your ever dare to strip a piece, I prefer to sand it. It is way less messy and for some reason therapeutic to me.
I did use a furniture stripper on this one. 
What a mess. But I’m sure there are better techniques it was just my first time. I always just hit furniture with my orbit sander.


Once you get all the original color off and your down to the raw wood. You will then apply the steel wool and vinegar. You have to make it up a few days before, there are lots of different recipes out there. But I just add a fine grit steel wool pad and fill a jar with vinegar. Mason jars work the best. I don’t cover it but I know some do. I will build up gases, I just did a mixture in Tupperware and within an hour it blew the top off. Leave it for a few days and you'll have the perfect grey stain.
I love the finish more than when I have used the stains with the grey color added to them. This stain is a more natural aged look.


The stain will look different on different woods. As you can see the table I applied it to was made from 3 different types of wood, so I had to apply more on certain parts. I didn’t mind the uneven look on this project. But remember each wood type will take differently just like any other stain.

Steel wool and vinegar stain gives your wood a natural weathered or aged grey finish.

Depending on the type of wood you are staining, steel wool and vinegar stain can produce anywhere from warm reds to an aged grey finish 


This sofa table had three different types of wood, so in some spots I purposefully went heavy. Stain takes differently on different woods. So make sure and test a spot to see the color you will achieve. Once the wood was completely dry I then applied white wax over the entire piece. I wanted to have the restoration hardware type of finish with layers. You can achieve this with applying either white wax or dark wax, depending on your preference.  You can seal it with polyurethane as well. 
There are all sorts of waxes on the market. This is the one I choose to use. The link below has info on how to apply the wax and how to purchase.
Also to apply the wax you need a stiff brush which you can find here

Here is  a close up of the finished sofa table. You can see the wax in the corners, the wax brings out any details and grains in the wood. 

 
 I hope this helps you make your home more personal and gives you the confidence to try something new.

Don't let fear of trying something hold you back. It's okay to make mistakes along the way, that's how we learn what we don't like.


When I use a product I do try to link it for you and if you decide to purchase the product I am affiliated with some of those companies. Its the only way to offset the time it takes building my how tos for decorating and DIY.

I am in no way asking you to click and purchase any items but it makes it easier for all the info to be on one site. Many different stores carry the products I use. But the links I provide is where I had purchased.


I hope that helps you make your home more personal and gives you the confidence to try something new.

Read More