
Stained black cabinets
- Black stain in poly+stain here or mini wax brand here
- plastic tarp
- mini foam roller
- brush
- tape
- tray
- all purpose cleaner
- light sanding pad
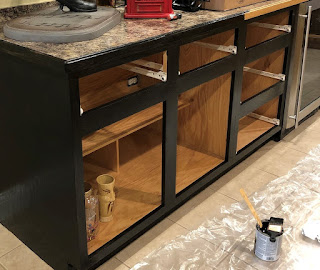
Take off all your doors and lay out on a flat surface on a tarp. Make sure to wipe down all the fronts of your cabinets and doors.I always start rolling the inside of the doors first, while they are laid out. That way you can get your technique down before you are working on the fronts of your doors.
Once you have one coat on the inside of your doors, you can move to the base of your cabinet fronts. making sure to cover all areas with your roller, and brushing along the trim and inside corners of your cabinets. .
It goes on pretty evenly but make sure to go back and check for any drips and even them out.
The stain does take a little longer to dry than if you were to paint them. But the finish is worth the wait time. After a couple of hours you can go back and add your second coat to the back of your doors and the cabinet front.
Let the doors dry overnight before flipping them over to work on your fronts.
Making sure to brush into any creases. Roll the stain over the front of the doors.
Once you have added your second coat on your doors, you can let that set for a good 6 hours, until they are no longer tacky to install the doors. you want to make sure to give them a good 24 hours to cure before using them.
Our basement bar had all honey oak cabinets. I wanted to update them without having to completely replace.
The Polyshades is great for applications like black or any dark colors, you don't wipe off the stain like you would with just regular stains. It really makes a nice finish for wood cabinets. The best part is that is requires little or no sanding. Depending on how much sheen you have on your wood cabinets.
I love this stain. It took so well to the wood cabinets. I absolutely love the finish!!! It can be bought here I just wiped the cabinets down and brushed and rolled on this black stain. I didn't sand mine at all.
This is not your traditional stain that you wipe off. SO do not wipe the stain off.
You will be able to scratch them until they are cured so give a couple of days to completely cure
Please excuse the mess, we have been in the new house just over a month. It feels like every time I get thru all the boxes We have a fresh pile coming thru the door.
I will leave the insides the oak color, all you need to do is the fronts and backs, then the fronts of the cabinets. I have found some cool peel and stick paper for the inside of the shelves and drawers. pics to come....
The stain was in black satin. It has the poly mixed with the stain so it works great for these cabinets instead of painting them. You can still see the wood grain even thru the black, and I prefer water based over oil basedMake sure you pay close attention to the finish you are getting when you pick your stain. I choose satin because I did not want super shinny finish. They come in gloss, satin, high gloss. So pay attention to the sheen you want to achieve on your finished project.
Here is another honey oak project I used the same stain in but in a dark brown, called mission oak.
Same great finish, just a little longer drying time than paint.
Again the original railing was the honey oak, which you can see the trim around the door in the background.
The finish is so smooth when it is finished. I love how it turned out. I hope this inspires you to do something fun in your home and give you a fresh look.
I hope this helps you make your home more personal and gives you the confidence to try something new.
Don't let fear of trying something hold you back. It's okay to make mistakes along the way, that's how we learn what we don't like.
When I use a product I do try to link it for you and if you decide to purchase the product I am affiliated with some of those companies. Its the only way to offset the time it takes building my how tos for decorating and DIY.
I am in no way asking you to click and purchase any items but it makes it easier for all the info to be on one site. Many different stores carry the products I use. But the links I provide is where I had purchased.
I hope that helps you make your home more personal and gives you the confidence to try something new.


