Drainboard Farmhouse sink redo

Monday, October 26, 2020

This sink is so large and gives my half bath so much character. When I bought my farmhouse, it had nothing original. I scored this sink outside in an alley waiting for the trash!! The crazy thing is I had been looking for a sink just like this for this bath. My half bath is off my kitchen which can be quite strange, So I just embraced the fact that I have this half bath off my kitchen. Adding this sink has just made this half bath such a show stopper..  My home is from 1901 so it's pretty cool to have a true farmhouse sink for our guest bathroom. 
To find out how I cleaned it here

Love old things 


The sink had the original cabinet as well, I didn’t ever plan to put them together. I knew I was wanting to find the perfect cabinet or dresser for the sink. 
The sink had no cracks or chips. I just had to bring it in and shine it up. I soaked it with CLR first trying to loosen up any deposits and residue or rust on the tub, I left that in the tub soaking for hours.
Once I finished that, I went back and scrubbed it with bleach, just to get anything that was left. 
Completely dry it out and give it a good scrub with a soft cloth and comet powder.
That should get all of all the old yuck off the porcelain sink.
Then go over it with a Magic eraser. They work great for any left over scuffs. I do need to redo from time to time give it a good scrub with the Comet powder.


I was able to find an antique dresser on craigslist  that was wide  and deep enough to hold the frame of the farmhouse sink. I removed the top of the dresser and braced the back with 2x4s. I had to cut the back off of the drawers and shorten them to allow for plumbing. These sinks have a big cast iron lip that held on great to the edge of the dresser.

The top two drawers are just the fronts, I had to completely take out the inside and just attach the front of the drawers.  
The bottom drawers are about 8 inches deep. I  used my circular saw to shorten them, and nailed the original back on to the shortened drawer. They aren't very deep but perfect for storing toilet paper rolls and extra hand towels.


They still make this faucet for these sinks, it wasn't easy to get the old off, I found the new one at my local Menards! I can not find the exact one anymore. This one here is similar from Amazon.
They have them in oil bronze finish as well, here and here they just don't have the little soap dish. Just make sure you measure the space between each mount for hot and cold to get the right size.

The mess before it gets pretty. Every project has to be ugly first...

The sink I had before just standard  boring. I had decided to go dark with the walls in Graphite Charcoal from Behr since the new sink was so white and such a show stopper for the room.


before......


Here it is waiting for the trash


I even loved this old cabinet but it had a lot of rust and I wasn't up for that kind of redo.


The flooring in this bathroom was done with peel and stick from floor pops. I purchased them on amazon. Here
New Mirror from Target

 I hope this helps you make your home more personal and gives you the confidence to try something new.

Don't let fear of trying something hold you back. It's okay to make mistakes along the way, that's how we learn what we don't like.


When I use a product I do try to link it for you and if you decide to purchase the product I am affiliated with some of those companies. Its the only way to offset the time it takes building my how tos for decorating and DIY.

I am in no way asking you to click and purchase any items but it makes it easier for all the info to be on one site. Many different stores carry the products I use. But the links I provide is where I had purchased.


I hope that helps you make your home more personal and gives you the confidence to try something new.


Read More

From honey oak to Black cabinets

Saturday, October 24, 2020


Stained black cabinets

Supplies 

  • Black stain in poly+stain here or mini wax brand here
  • plastic tarp
  • mini foam roller
  • brush
  • tape
  • tray 
  • all purpose cleaner
  • light sanding pad 
Take off all your doors and lay out on a flat surface on a tarp. Make sure to wipe down all the fronts of your cabinets and doors.

I always start rolling the inside of the doors first, while they are laid out. That way you can get your technique down before you are working on the fronts of your doors.
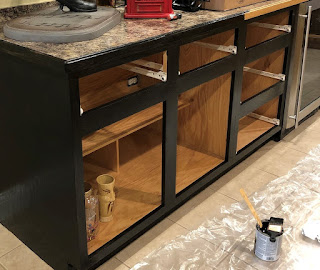

Once you have one coat on the inside of your doors, you can move to the base of your cabinet fronts. making sure to cover all areas with your roller, and brushing along the trim and inside corners of your cabinets. .

It goes on pretty evenly but make sure to go back and check for any drips and even them out.


The stain does take a little longer to dry than if you were to paint them. But the finish is worth the wait time. After a couple of hours you can go back and add your second coat to the back of your doors and the cabinet front.

Let the doors dry overnight before flipping them over to work on your fronts.
Making sure to brush into any creases. Roll the stain over the front of the doors. 
Once you have added your second coat on your doors, you can let that set for a good 6 hours, until they are no longer tacky to install the doors. you want to make sure to give them a good 24 hours to cure before using them.


Our basement bar had all honey oak cabinets. I wanted to update them without having to completely replace. 
The Polyshades is great for applications like black or any dark colors, you don't wipe off the stain like you would with just regular stains. It really makes a nice finish for wood cabinets. The best part is that is requires little or no sanding. Depending on how much sheen you have on your wood cabinets.


I love this stain. It took so well to the wood cabinets. I absolutely love the finish!!! It can be bought here 
I just wiped the cabinets down and brushed and rolled on this black stain. I didn't sand mine at all.
This is not your traditional stain that you wipe off. SO do not wipe the stain off. 
You will be able to scratch them until they are cured so give a couple of days to completely cure


Please excuse the mess, we have been in the new house just over a month. It feels like every time I get thru all the boxes We  have a fresh pile coming thru the door.

I will leave the insides the oak color, all you need to do is the fronts and backs, then the fronts of the cabinets. I have found some cool peel and stick paper for the inside of the shelves and drawers. pics to come....


The stain was in black satin. It has the poly mixed with the stain so it works great for these cabinets instead of painting them. You can still see the wood grain even thru the black, and I prefer water based over oil based
Make sure you pay close attention to the finish you are getting when you pick your stain. I choose satin because I did not want super shinny finish. They come in gloss, satin, high gloss. So pay attention to the sheen you want to achieve on your finished project.


Here is another honey oak project I used the same stain in but in a dark brown, called mission oak.
Same great finish, just a little longer drying time than paint.
Again the original railing was the honey oak, which you can see the trim around the door in the background.


The finish is so smooth when it is finished. I love how it turned out. I hope this inspires you to do something fun in your home and give you a fresh look.


 I hope this helps you make your home more personal and gives you the confidence to try something new.

Don't let fear of trying something hold you back. It's okay to make mistakes along the way, that's how we learn what we don't like.


When I use a product I do try to link it for you and if you decide to purchase the product I am affiliated with some of those companies. Its the only way to offset the time it takes building my how tos for decorating and DIY.

I am in no way asking you to click and purchase any items but it makes it easier for all the info to be on one site. Many different stores carry the products I use. But the links I provide is where I had purchased.


I hope that helps you make your home more personal and gives you the confidence to try something new.


Read More

Stained railing, with painted white spindles.

Updating honey oak railing. 

The product I used was stain+poly in mission oak satin by Varathane from Home Depot. Click here for link to product. Amazon carries the Miniwax brand in the same product here
With this project I did lightly sand the hand rail just took a sponge and wiped down the top of it wear it gets the most use. I however did not sand the large spindles or the base. This product really adheres to the wood. Once it cures it has a very durable finish.
The finish was so smooth after the new stain dried.
I wish painting the trillions of spindles was as gratifying and as simple. But it took what felt like forever....a week


 The staining was the easy part. It covered well, some areas took more the 2 coats but for the most part it was a 2 coat process. I was so happy with the update and it really broke up the honey oak that was throughout the house. As you can see this was a labor of love but worth it in the end. 


 I hope this helps you make your home more personal and gives you the confidence to try something new.

Don't let fear of trying something hold you back. It's okay to make mistakes along the way, that's how we learn what we don't like.


When I use a product I do try to link it for you and if you decide to purchase the product I am affiliated with some of those companies. Its the only way to offset the time it takes building my how tos for decorating and DIY.

I am in no way asking you to click and purchase any items but it makes it easier for all the info to be on one site. Many different stores carry the products I use. But the links I provide is where I had purchased.


I hope that helps you make your home more personal and gives you the confidence to try something new.


Read More

Peel and stick tile over ceramic tile

For the link to these cute DIY tiles click .here is the link for the tiles  These floor tiles from Amazon were super easy to work with. I did have some lifting on the corners but was able to add some pressure, (aka books) they have stuck perfectly. For the link to these cute DIY tiles click . I was amazed to see they were thin enough to stick right over my ugly boring ceramic tiles we had throughout the first floor. You don't need to fill the grout lines underneath, the tiles are thick enough that you wont notice them once they are installed.


I was able to cut these with scissors they really were easy to cut. I used the paper backing as a template to trace around the toilet.

I have had lots of questions about the transition from kitchen to bathroom tile. Normally you would do something like this below. Depending on what fits under your door.
, and what your transitioning too, carpet, wood,.....I have done nothing because I plan to change my kitchen floor at some point and I don't quite yet know with what.


I know some people don't like dark walls, and my entire house is light grey. I needed some flavor in my guest bathroom and I’m not afraid of paint. If it’s horrible you can repaint. ❤️
I installed these in 2019 and have no lifting or popping. There isn’t a shower in this room, it’s off the kitchen and does get a lot of traffic. My house is over 100 years old and this room is drafty but they have stayed in place. I’m happy I went for it!

 Frequently asked questions???

Will they be easy to remove? -no these aren't peel and stick removable like a lot of the new products for walls. These are actual peel and stick tiles, like have been around for decades.

Do you need additional glue?-I did not, I have seen posts were some have had to add adhesive to the corners, I applied books to some of the tiles that lifted during installation and let them dry then removed the books. I had no problems with lifting.

Do these work over linoleum? Yes I believe the product is a type of linoleum

What do you use over the transition? They sell all different types of transitions, it all depends on what your transitioning to. They have carpet, wood, tile. 

Can you get them wet?-Yes they are actual floor tiles, they aren't as durable as ceramic tile but I have had no problems with water.

Can you use them on walls?- I haven't tried this to verify but I have seen lots of posts of people doing this. Floorpops does carry backsplash ones too.

Did you remove the toilet?-No I did not, the proper way would be to remove the toilet but I just used the backing paper from another tile to create a template for my next cut.

How did you cut them?-I used scissors. 

Did you fill your grout lines?- I did not, I was worried at first so I laid with caution, but they did not sink into the grout lines, nor have they do this date, they are over a year old.

I am in no way an expert on laying tile. Hence the peel and stick over ceramic, they do make a lot of products now that you can lay right over tile, floating floors ect... I know a lot of people in the trade would say to remove all tile or underfloor to do it the "right" way.  But this works for me and my home. My hopes is this inspires you to do something fun and love your space.

 I hope this helps you make your home more personal and gives you the confidence to try something new.

Don't let fear of trying something hold you back. It's okay to make mistakes along the way, that's how we learn what we don't like.


When I use a product I do try to link it for you and if you decide to purchase the product I am affiliated with some of those companies. Its the only way to offset the time it takes building my how tos for decorating and DIY.

I am in no way asking you to click and purchase any items but it makes it easier for all the info to be on one site. Many different stores carry the products I use. But the links I provide is where I had purchased.


I hope that helps you make your home more personal and gives you the confidence to try something new.


Read More

DYI Halloween wreath

Thursday, October 8, 2020

This DIY wreath was so fun and simple. I just used a spool of 4 inch Halloween ribbon, cut them into 4  inch pieces, then attached them with zip ties around the metal wreath. Then for the love of all skulls, I glued with my hot glue gun different size Styrofoam skulls.


Read More

Halloween 2020

Tuesday, October 6, 2020

  Halloween is just as exciting for me as Christmas. I love to use my summer plants as a transition for Halloween, as the weather drops they start to die and lose color. By the time Halloween came my ferns had a nice brown tint to them.


These were some old bottles we had around the house, we just found some images we loved off of Pinterest printed them and glued them to the bottles.


these amazing shelves where purchased from Art Van furniture. I'm so sad they closed.  


Read More